
On a visit to some friends I became aware of the whole topic of Sous Vide “under vacuum” (SV) cooking, the concept of using a controlled water bath to cook food (particularly meats) at low(er) temperatures for more consistent and desirable results. High end restaurants have been doing this for a while. At the time, Sous Vide systems were quite expensive but some home cooks were doing ingenious hacks to simulate a professional SV cooker by using hot water in beer coolers, etc. In that discussion, I mentioned that I thought one of the small computers I was toying with for home automation (HA) could make a simple & cheap SV system with some other basic parts.
It took me some time to come back around to the whole SV idea myself. Not too long ago I came across a great deal on some London Broil at Market Basket and that served to get me going on setting up my own SV system using parts I had already at the house from my previous HA projects. While there are now some SV immersion systems on the market for under $200, I thought I had everything needed to make one on hand. I figured I could try it out and see what I thought of SV cooking without spending any more money. Here’s what I came up with.
DISCLAIMER: This post is just to document what I did. I’m a hobbyist and know almost nothing above my tinkering. I DO NOT MAKE ANY ASSURANCE THAT THIS IS APPROPRIATE FOR HEALTH OR SAFETY CONSIDERATIONS. YOU ARE RESPONSIBLE FOR YOUR OWN FOOD HEALTH DECISIONS AND FOR USING ELECTRICITY RESPONSIBLY. I WILL NOT BE HELD LIABLE FOR ANY ACTION YOU TAKE TO FOLLOW THIS SAME PATH AND ANY DAMAGE THAT MAY RESULT. YOU HAVE BEEN WARNED! But should you make some delicious food as a result please comment to let me know!
OK, with that out of the way, here’s a photo of my solution:
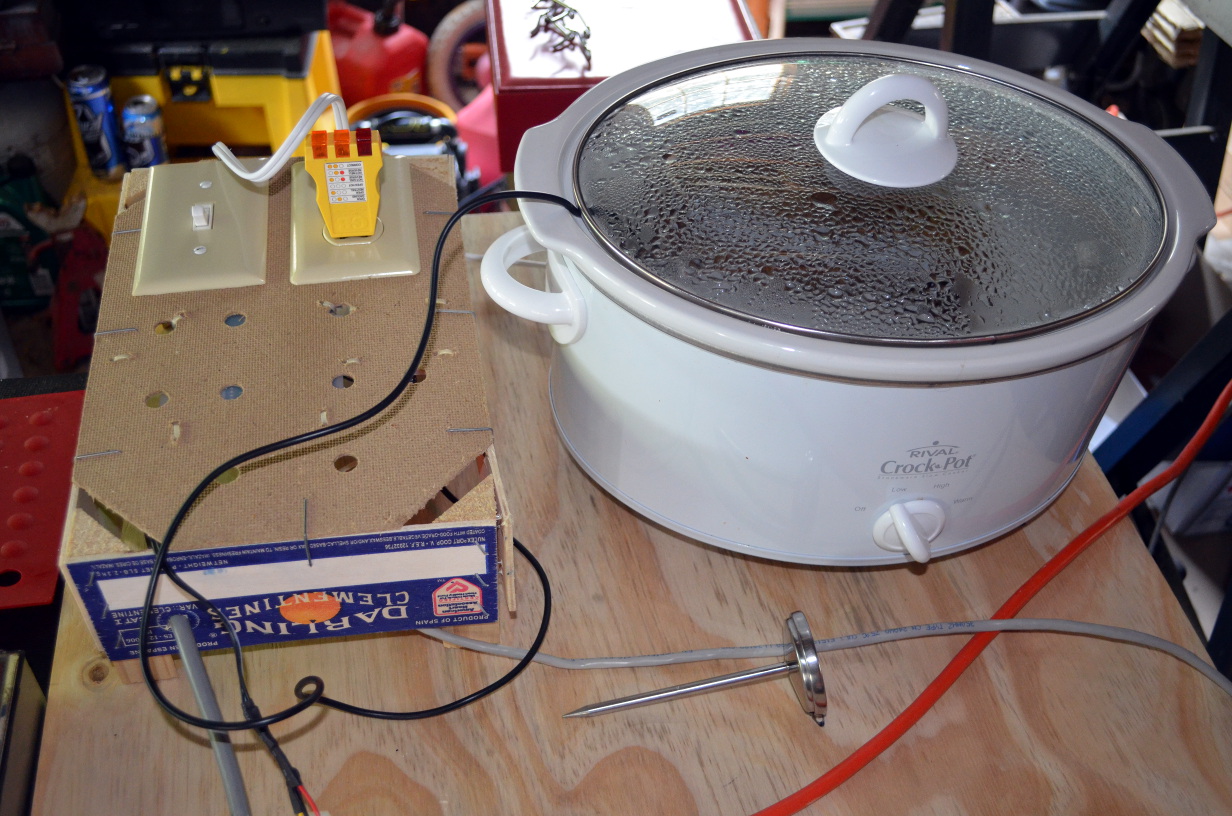
The major parts here are:
- standard Crock Pot slow cooker
- Programmable Power Controller, consisting of:
- CAI WebControl PLC (Programmable Logic Controller) unit
- DS18B20 1-wire temperature sensor, embedded in a stainless steel probe
- AC to 9v DC power adapter
- 5v “Arduino” relay board
- Misc. breadboard wires, low voltage wires and a PC 12v fan connector
- 110v home wiring components:
- Light switch
- Power outlet
- Appliance power cable
- Misc. wires and connectors
Update 5/29/2016:
I’ve now been using this set up successfully for nearly a full year. Today I’m doing a SV Leg of Lamb for later finishing on the BBQ grill. Other meals have included lots of chicken, pork and beef – each one has turned out really well (I’ve yet to do fish, but will try it soon). I’ve not posted my PLC code up to now because I was awaiting it becoming stable – which I think I can now consider it, as it’s pretty much worked unchanged since day1 – so here it is. A bit of explanation:
HEAT_ON is a subroutine to energize the power relay, HEAT_OFF does the opposite.
HEAT_MAIL informs me of changes in state of the power relay.
Using the WebControl PLC’s General Setup page, various values can be set to control the program:
UROM1 is the desired set point (degF *10), so 1360 is 136.0 deg
UROM2 is the lower offset (degF * 10), so 8 is 0.8 deg – this controls the amount of swing in the actual temperature and will need to be tweaked for a given crock pot. This determines the actual point at which the heat will be turned on.
UROM3 is to enable or disable the power relay. 1 enables.
UROM4 is to enable or disable the email notices. 1 enables.
START

	SET VAR1 0

	TSTEQ TS1 0

	EMAIL EM1

	SUB UROM1 UROM2 VAR1

	TSTLE T1 VAR1

	CALLSUB HEAT_ON

	TSTGE T1 UROM1

	CALLSUB HEAT_OFF

	END
HEAT_ON:
TSTEQ OP2 0
SET VAR4 -1
TSTNE UROM3 1
SET OP2 0
TSTNE UROM3 1
RET
SET OP2 1
SET VAR2 T1
TSTEQ VAR4 -1
CALLSUB HEAT_MAIL
SET VAR4 0
RET
HEAT_OFF:
TSTEQ OP2 1
SET VAR4 1
SET OP2 0
SET VAR3 T1
TSTEQ VAR4 1
CALLSUB HEAT_MAIL
SET VAR4 0
RET
HEAT_MAIL:
TSTNE UROM4 1
RET
TSTEQ VAR4 -1
EMAIL EM2
TSTEQ VAR4 1
EMAIL EM3
RET
I’ve also set up a script on a Raspberry Pi on our network which I use for data logging of each batch. At 10 minute intervals it captures the relay state and current bath temperature into a .csv file via a URL get from the WebControl. I can use this data for tweaking the UROM2 value above and for modifying my recipes going forward.
I’m very pleased with the system now and may be extending it to control more than one bath. For instance, today I was wanting to do both a pork loin and the lamb leg at the same time. There’s not enough space in the crock pot for both, despite the temperatures being able to be the same (but duration differing). With some code changes and multiple probes & relays I could control several baths.
I may also be creating an internal web portal on the pi which could provide real-time graphing and settings management for the SV set up, so I don’t have to look up what UROM values mean what each time! 🙂 This will be more important if/when I extend it to multiple baths, as only the UROM values have a built-in web interface on the WebControl unit.